Here you will find general instructions on how to use the UTU Geospatial data service.
1. Registering
Join the UTU Geospatial data service community by registering and updating your profile. As a member, you may access all features of the service, such as uploading layers and documents, and saving maps you have created.
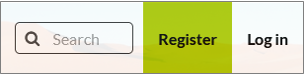
- Click Register in the top-right corner.
- Fill out the form. Enter your email, create a username and a password.
- After administration of the service validates your account, you will get an email to confirm your account. After confirmation you are good to go and Log in to UTU Geospatial data service. Welcome aboard!
2. Updating profile
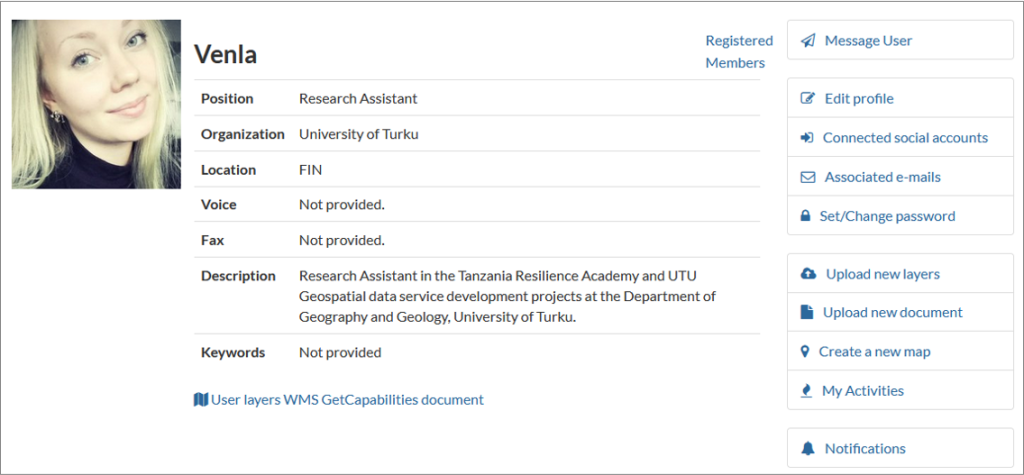
First task after registering for you is to edit your user profile. Share information about you to the community by telling who you are, what your position is and where you are from. You can update this information anytime.
Edit profile information
- After signing in, go to your Profile page by clicking your username in the top-right corner.
- From the right-hand side menu, click Edit profile.
- Edit your personal information by adding your name, description of yourself and contact information. You can even edit your avatar.
- When finished, click Update profile at the bottom of the page.
Other settings
From the same right-hand side menu, you can access other user settings as well, such as changing your password and setting your notification preferences. You can find other interesting links and activities from this menu as well, feel free to explore them!
3. Publishing data
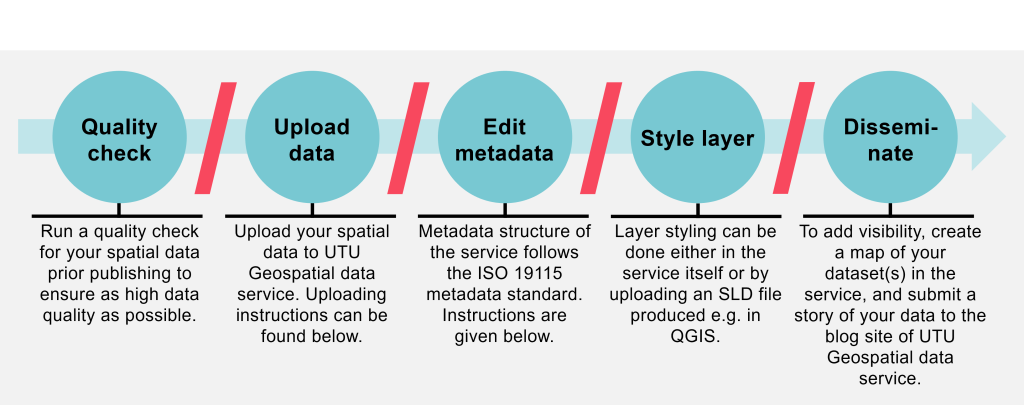
Quality checking
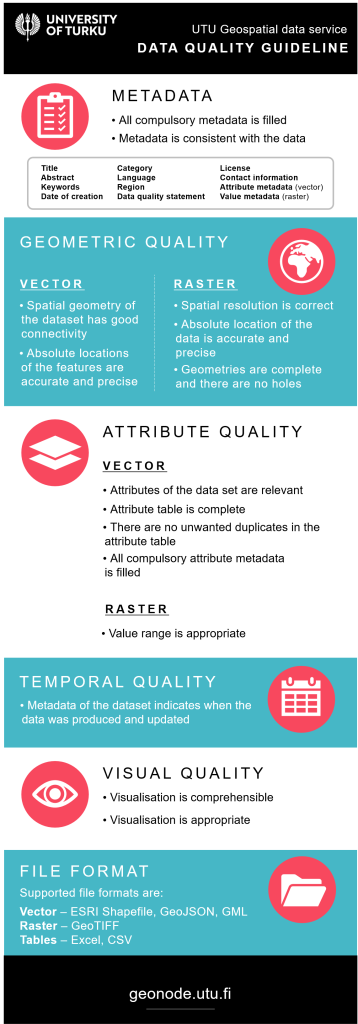
Running a quality check for a geospatial dataset prior publishing is a crucial step to ensure high-quality of the data. All datasets are unique and therefore need case-specific quality assurance steps. UTU Geospatial data service provides a general list of quality checking activities that can be applied to publishable datasets. A summary of the checklist is provided below. A more detailed guide with descriptions can be downloaded via the service, for vector or raster datasets.
Uploading
- Sign in.
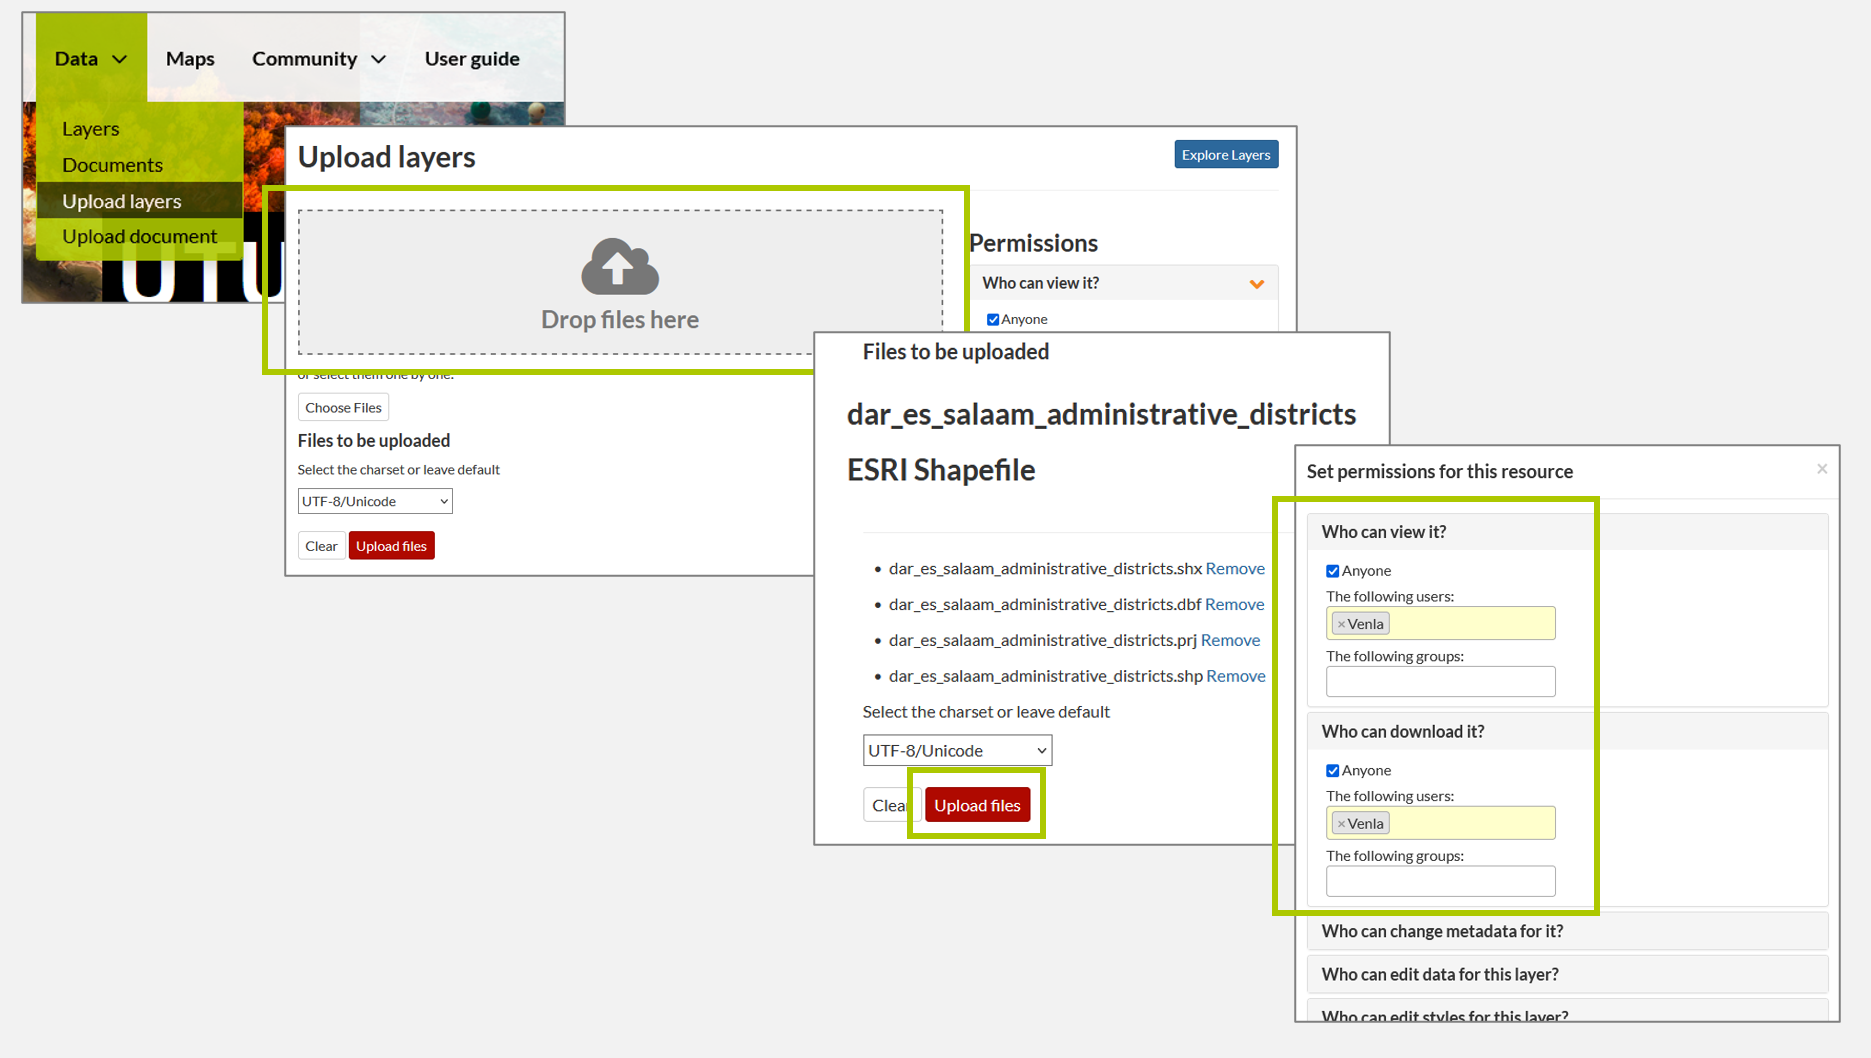
- Click Data > Layers in the top navigation bar, and then click Upload layers from the top-right corner.
- Follow the instructions of the upload page. Files needed for vector datasets in Shapefile format are: .shp .shx .dbf .prj and in GeoJSON format: .gjson. File needed for raster datasets in TIFF format is: .tif.
- Click Upload files and wait until they have been successfully loaded.
- Change the permission settings, if relevant. The permissions can be changed afterwards. In case the dataset should not be published right away, uncheck the “Anyone” boxes under sections Who can view it? and Who can download it?
- Click Edit metadata. See the next section.
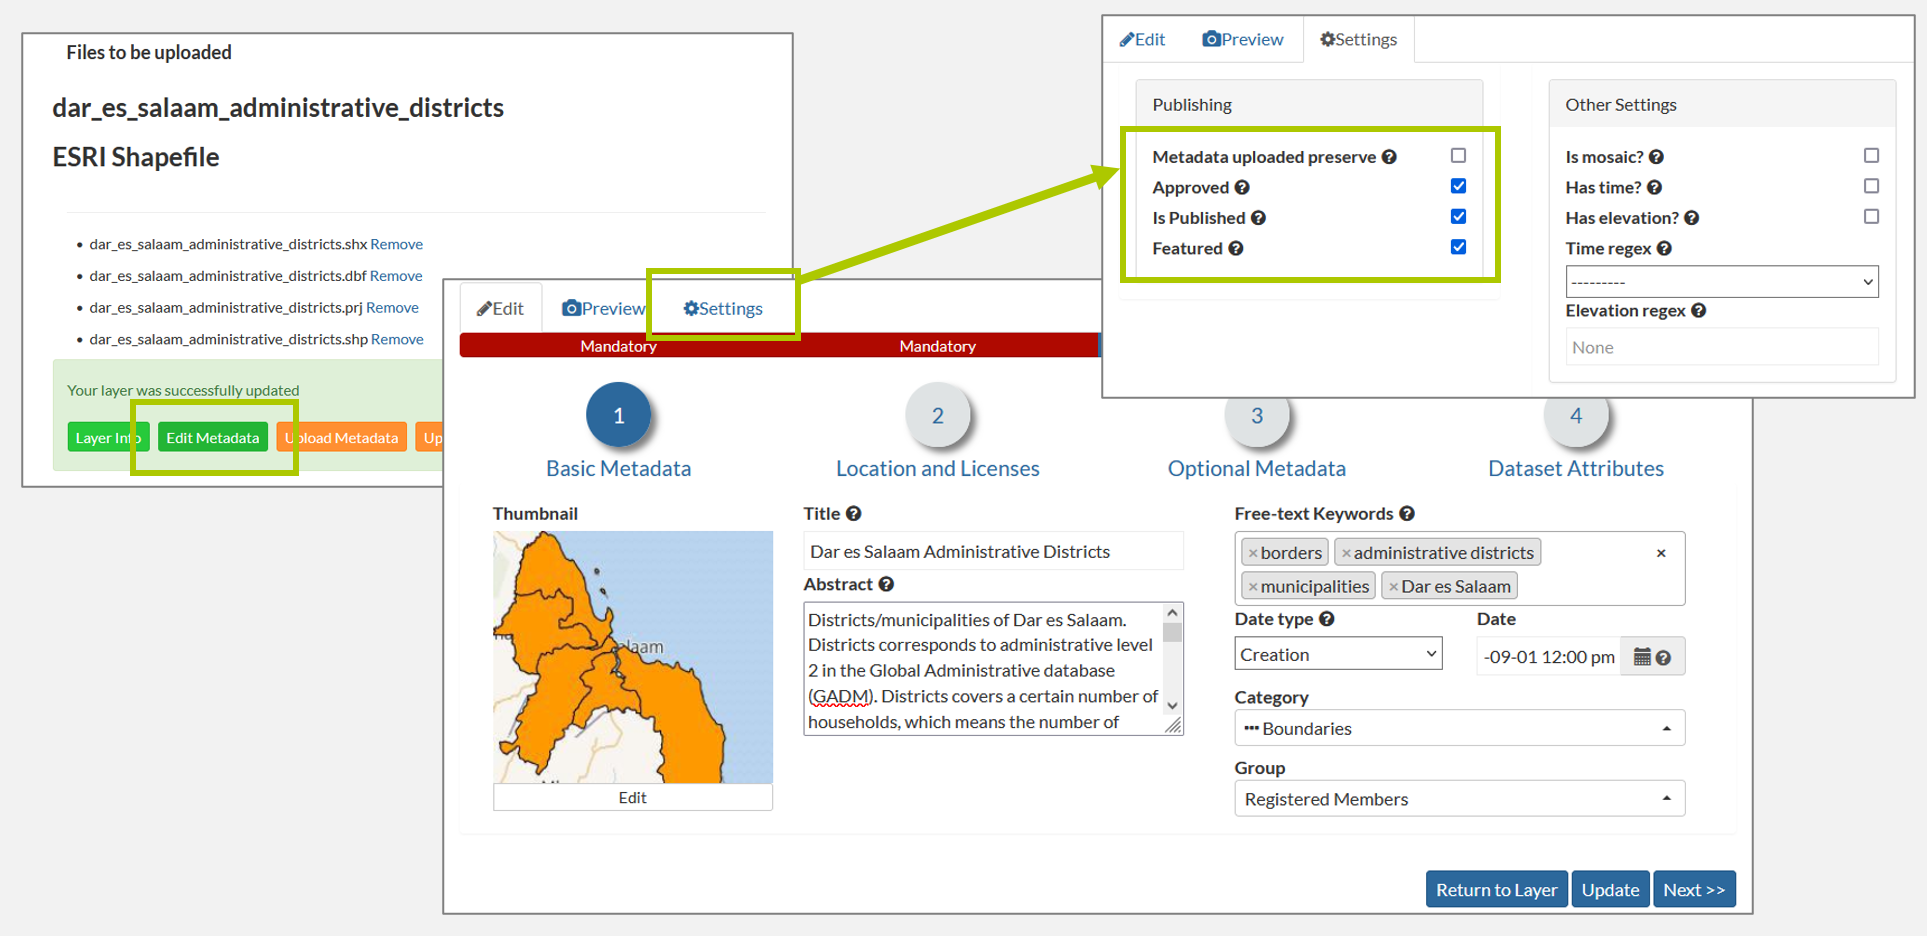
Editing metadata
- Fill in all metadata fields of the Metadata Wizard that opens up. Use this Metadata instruction as a guide to reach a high-quality metadata. Don’t forget to fill in attribute metadata for vector layers!
- Modify settings for layer visibility:
- Approved (ticked by default): Dataset is ready to be published.
- Is Published: Dataset is displayed for all users in the service.
- Featured: Dataset can be featured on service homepage in the “Most recent dataset” field.
- When you are ready, click Update. You are redirected to the layer page.
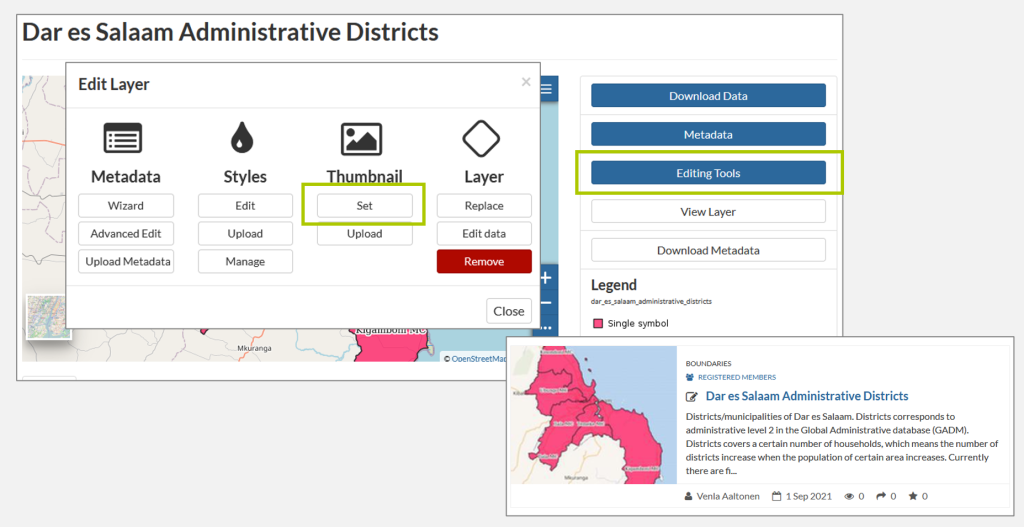
- If you want to edit the metadata later, click Editing tools from the right-hand side menu, and choose Wizard.
- If you want to edit layer permissions, scroll the page down and click Change Layer Permission from the right-hand side menu.
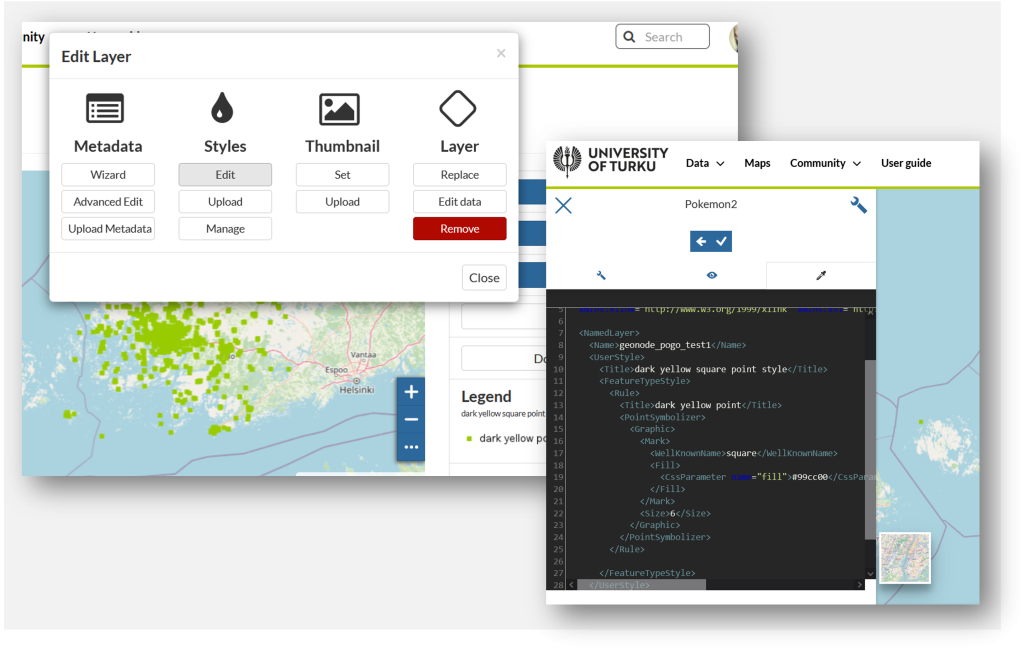
Styling layers
Current GeoNode version supports only CSS styling, and visual styling interface is not available. The CSS styling editor has the same structure as GeoServer, and tips for styling can be found e.g. from this quide: https://docs.geoserver.org/stable/en/user/styling/sld/extensions/pointsymbols.html.
A guide for visual styling editor will be added when the GeoNode version is updated!
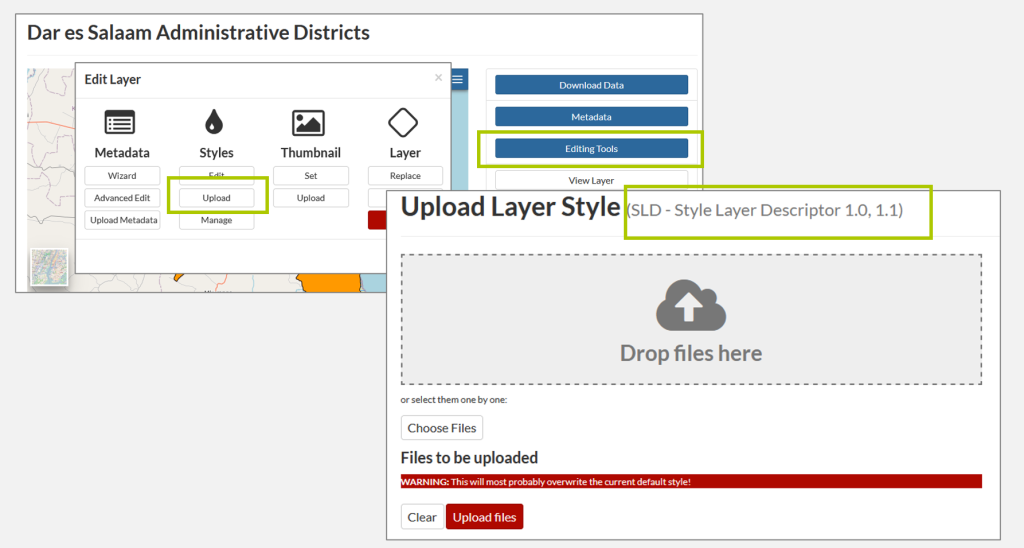
Uploading styles
Custom styles can be uploaded to UTU Geospatial data service to override the default styling that is created automatically when a layer is uploaded to the service. The style must be a SLD (Styled Layer Descriptor) file, which can be easily exported e.g. from QGIS. Geoserver has a great instruction for saving SLD’s in QGIS.
- Go to the layer page of that specific layer of which you want to style with the SLD file you have created. Note: you must be signed in, and have permissions to edit the layer in order to edit its style!
- Click Editing Tools. Choose Upload from the Styles section of the pop-up-window.
- Drag-and-drop or choose the SLD file and click Upload files.
- Click Layer info to view the new style in action!
- Update layer thumbnail from Editing tools > Thumbnail > Set.
Hint: Sometimes the GeoNode-platform can be a bit tricky when updating styles. In case of problems, make sure the attributes of the style matches with layer attributes, check that there are no spaces or other uncommon symbols in the name of the style, or try re-uploading the entire layer.
4. Using data
Layers, i.e. geospatial research datasets and documents related are the main content of the UTU Geospatial data service. The number of datasets is increasing and thus they serve ever growing group of potential users. You may browse through the datasets and documents, or search for a specific theme or research group, download them to your own device, or upload and publish your own research project’s data in the service.
Explore layers
Use search functions to browse through layers.
- Search by name – type in any word to search related layers
- Type – choose whether to view vector or raster layers only
- Categories – filter layers by metadata categories
- Groups – filter layers by research group
In case no layers appear, try different search functions and filters or click Clear to start over.
Download layers
You may download individual layers through the UTU Geospatial data service by following steps below.
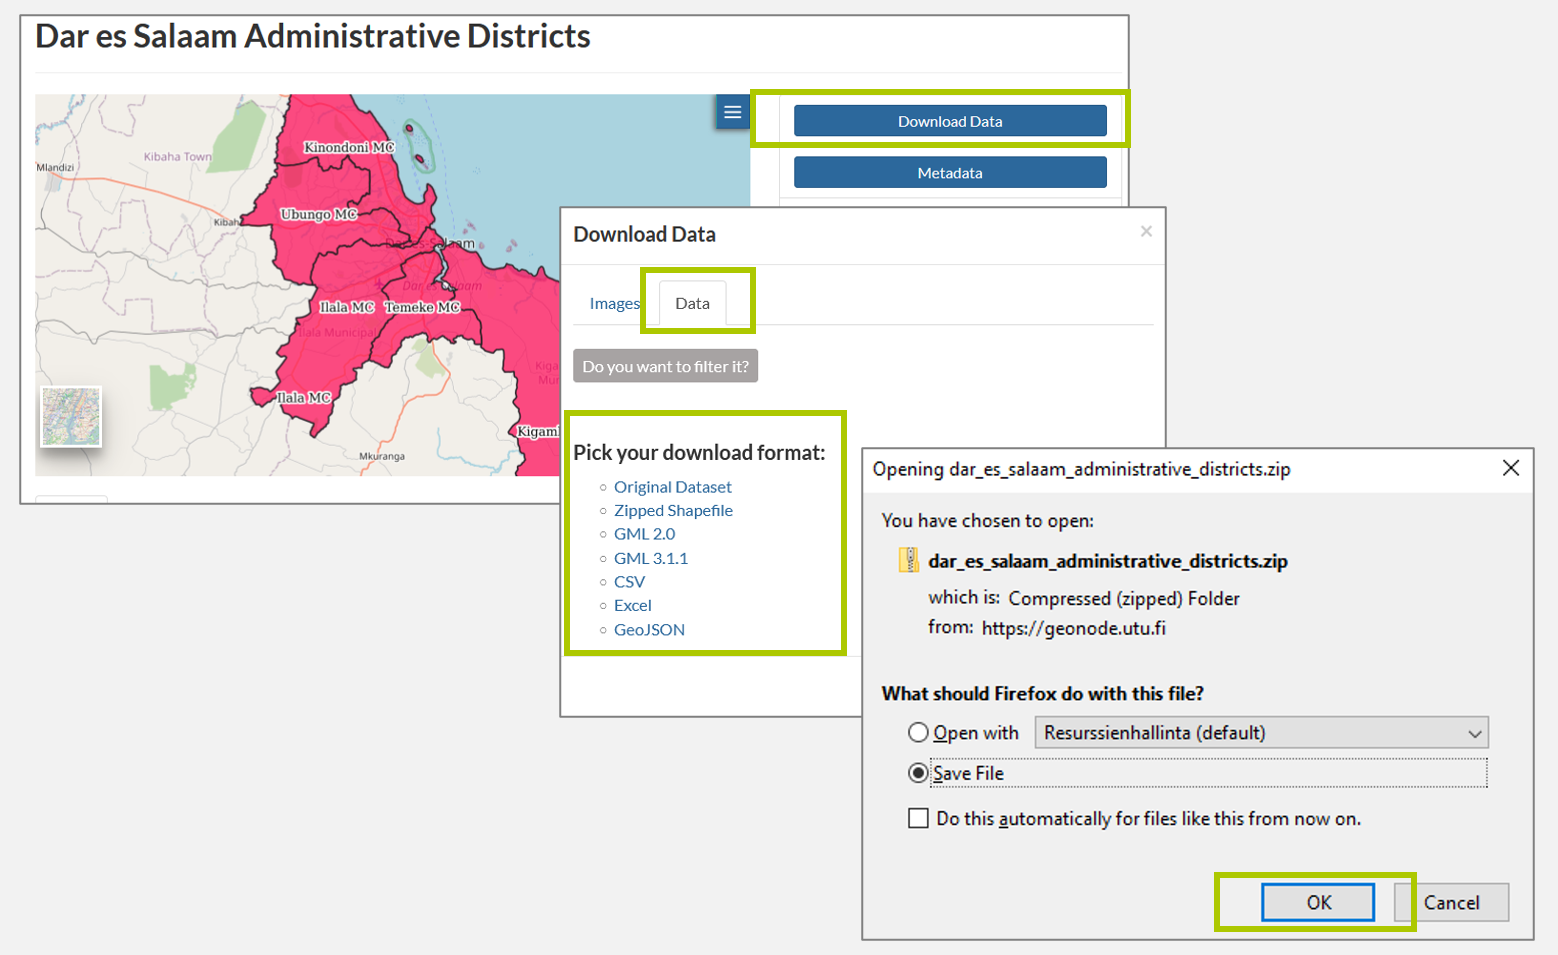
- Navigate to the layer page of the desired layer.
- Click Download Layer from the right-hand side menu.
- Go to Data tab.
- Download the layer in the format of you choosing. Vector layers are suggested to download as Zipped shapefile or Original dataset. Also, some tabular formats are usually available, such as Excel and CSV. Raster layers are suggested to download as GZIP, GeoTIFF or Original dataset.
- Note: If the file size is very big, the option Original dataset redirects you to a Seafile folder from where you can download the data in the given format.
- If you downloaded the data in zipped format (Zipped shapefile or GZIP), extract the files to a desired folder by right clicking the zipped folder and choosing Extract all… (or similar).
WMS/WFS capabilities
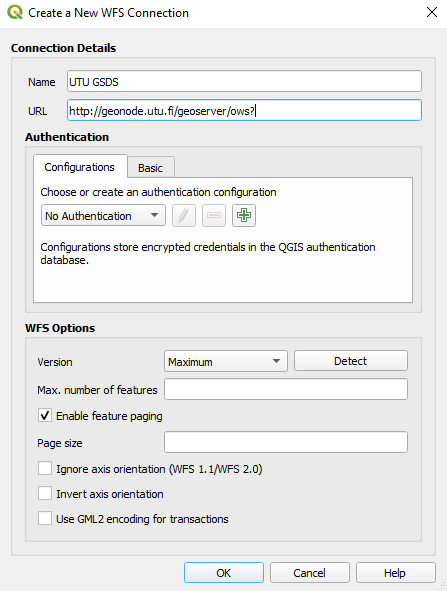
An easy way to access all layers in the UTU Geospatial data service is via GIS software, such as QGIS. Layers can be accessed by using Web Feature Service or Web Map Service.
- Open QGIS > Layer > Add Layer… > Add WFS Layer.
- Create a new WFS connection. Name the connection as you please, e.g. “UTU GSDS”. Connection URL is: http://geonode.utu.fi/geoserver/ows?
- Click Ok.
- Click Connect and wait for a couple of seconds for the layer list to appear.
- Now you are able to add any of the layers to your workspace with editing capabilities.
Documents
In addition to spatial datasets, different kinds of documents can be uploaded to UTU Geospatial data service. Documents can be, for example, project reports related to the datasets that are published in the service, protocols, and instructive documents.
- Navigate to Resources → Document in the top navigation bar.
- Filter the documents by choosing desired categories. You can also use free-text search words and sort the documents alphabetically or by date.
- Click the title of the document you are interested in. On the document page, you can read the metadata of the document, and comment, rate and share it.
- Download and open the document by clicking the title or Download document.
5. Community
The UTU Geospatial data service community is ever expanding when researchers, educators, students, and others share and use high-quality spatial research data. You can explore registered members and interact with them through the service.
Explore people
Find out who else is part of the database community by exploring registered users.
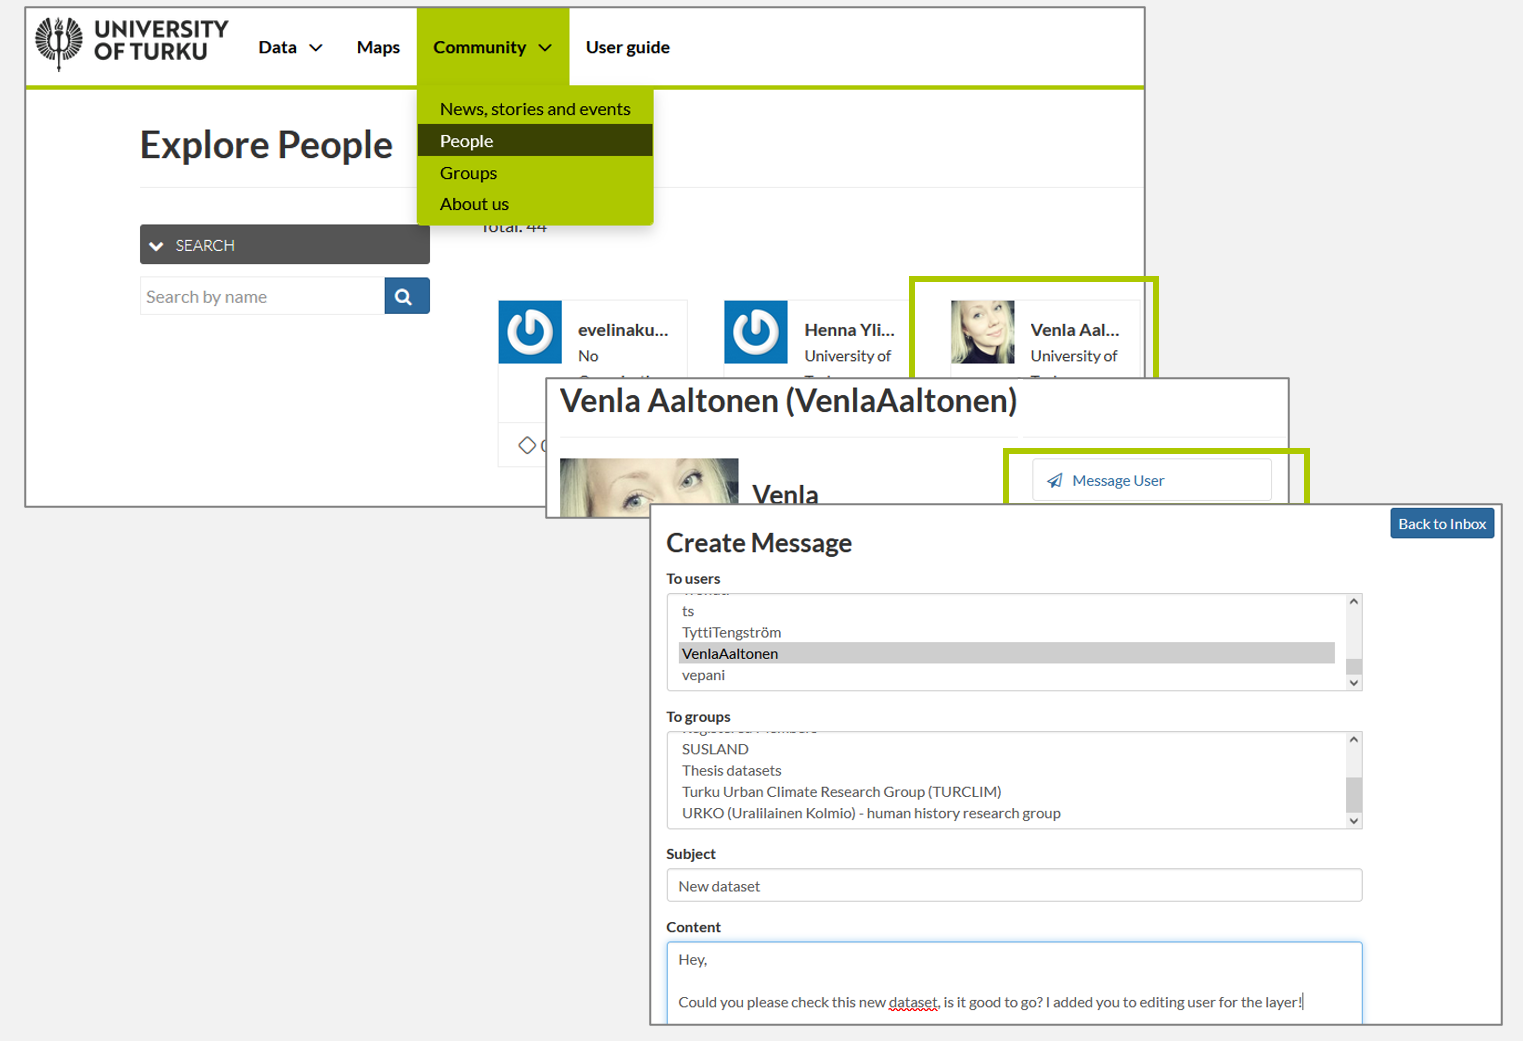
- Click Community –> People from the header menu.
- Explore people by searching them by their name, sorting the profiles or going through them page by page.
- Click that member’s username whose profile you want to explore.
Contact users
You can view other members’ profiles to get to know them more, and even send them messages.
- When you are in your own or in someone else’s profile page, click Message User.
- Select the user you want to message from the first list. You can select multiple users by holding CRTL from your keyboard and clicking the names, simultaneously.
- Alternatively, if you want to reach all members of a research group, select the group from the second list.
- Give your message subject and write the message. When ready, click Send message.
- You can view your conversations in your Inbox. Access it by clicking your username in the top-right corner and selecting Inbox.
6. Maps
Layers that are uploaded to the UTU Geospatial data service can be used in various maps, which are made by researchers sharing their datasets. (Thematic) maps can be very informative and a powerful way of information communication and they can be used to for example represent phenomena or show multiple layers at once for comparison.
Exploring maps
- Click the title of a map that sounds interesting.
- Information page of that map opens up. Here you find metadata and a preview of the map. You can leave comments or ratings and share the map in your social media networks by browsing the tabs below the map window.
- For more detailed exploration, click View Map from the right-hand side menu. Map view opens up where you can pan, zoom and query the map, search locations, choose which layers are visible and even measure distances on the map. Explore the functions and have fun with the maps!
[IMAGE – example of a map]
Creating maps
In the making!
8. News, stories and events
Submit data stories
Inspiration for digital data stories is gathered to this blogpost!
UTU Geospatial data service publishes blogposts related to datasets shared via the service. These data stories work towards more open communication about the science and results of the research projects and intrigue potential users of the data. The data stories can consist of e.g. data presentation, researchers’ interviews, map visualisations and photos.
The text should be in English and about 300-1000 words. You can also add links to the website of your research group or to publications for more information. Pictures and maps should be in .png or .jpg format and the file size should be max. 5 MB.
Send your story to voaaal@utu.fi for publication.